Last post we analyzed a technique of doing amplified DDoS attacks using Quake 3 servers through spoofing UDP requests to get some game statistics info. In this post I show potential ways of mitigation as well as how to detect this kind of attack at a network level and how to try to automatically parse the attack’s traffic and generate some firewalling rules.
Mitigating at the Quake 3 server side
If we search a bit about Quake 3 servers being used to carry on DDoS attacks we will find this kind of attack is known since some years ago and, in fact, not only Quake 3 are prone to this type of attack but others games based on Quake 3 engine as well (as COD).
I decided to dig into ioq3 server code to see if there is any kind of mitigation for this type of attack, grep in hand:
greping for potentially interesting strings
12345678910111213141516171819202122
~/ioq3/code/server$ grep -iRn 'flood' *
server.h:291:extern cvar_t *sv_floodProtect;
sv_client.c:36:flood the server with invalid connection IPs. With a
sv_client.c:78: // excess outbound bandwidth usage when being flooded inbound
sv_client.c:1621: // including the usercmd. This causes flooders to lag themselves
sv_client.c:1627: sv_floodProtect->integer &&sv_client.c:1979: return; // we couldnt execute it because of the flood protection
sv_init.c:649: sv_floodProtect= Cvar_Get ("sv_floodProtect", "1", CVAR_ARCHIVE | CVAR_SERVERINFO );
sv_main.c:58:cvar_t *sv_floodProtect;
sv_main.c:550: // excess outbound bandwidth usage when being flooded inbound
sv_main.c:613: // excess outbound bandwidth usage when being flooded inbound
~/ioq3/code/server$ grep -iRn 'amplif' *
sv_client.c:70: // Prevent using getchallenge as an amplifier
sv_main.c:542: // Prevent using getstatus as an amplifier
sv_main.c:605: // Prevent using getinfo as an amplifier
sv_main.c:712: // Prevent using rcon as an amplifier and make dictionary attacks impractical
~/ioq3/code/server$ grep -iRn 'dosed' *
sv_client.c:77: // Allow getchallenge to be DoSed relatively easily, but prevent
sv_main.c:549: // Allow getstatus to be DoSed relatively easily, but prevent
sv_main.c:612: // Allow getinfo to be DoSed relatively easily, but prevent
It seems that ioq3 developers have integrated some mitigating mechanisms against DDoS attacks, both when Q3 server is being used as an amplifier and when Q3 is directly attacked with a traffic flood, so take a deeper look into those mechanisms:
ioq3 DDoS detection and mitigation mechanisms - sv_main.c:542
123456
// Prevent using getstatus as an amplifierif(SVC_RateLimitAddress(from,10,1000)){Com_DPrintf("SVC_Status: rate limit from %s exceeded, dropping request\n",NET_AdrToString(from));return;}
When an IP address sends a “getstatus” command some checks are done prior of let command passing, “SVC_BucketForAddress( from, burst, period )” call will look for associated data to “getstatus” sender IP address:
ioq3 DDoS detection and mitigation mechanisms - sv_main.c:505
123456789101112
/*================SVC_RateLimitAddressRate limit for a particular address================*/qbooleanSVC_RateLimitAddress(netadr_tfrom,intburst,intperiod){leakyBucket_t*bucket=SVC_BucketForAddress(from,burst,period);returnSVC_RateLimit(bucket,burst,period);}
Now ioq3 will check if sender IP address has exceeded established rate limit, being it 10 commands in just one second period (remember previous call “if ( SVC_RateLimitAddress( from, 10, 1000 ) )”):
ioq3 DDoS detection and mitigation mechanisms - sv_main.c:475
As seen, ioq3 server implements some mitigation techniques to avoid using servers as amplifiers but, because they are based on rate limits, an attacker could use them sending at lower rates to avoid being filtered by amplifiers servers, circumventing this protection. A good approach to this type of attack could be implementing challenge-response methods in the game protocol to avoid sending big answers to requests that doesn’t contain a valid challenge token. Because of the nature of this kind of protection, an attacker shouldn’t be able to spoof the token request and get it to use in spoofed “getstatus” query nor predict a valid token to avoid token request phase and just use a pre-generated token in spoofed “getstatus” request (as well as being unable to doing a replay attack using previously used tokens), probably I am going to write another more detailed post about this and other stuff I found while doing some research in the future.
On a similar way to ioq3 server implementation mitigation techniques we could set up an iptables rate limiting policy to automatically drop any traffic from spoofed IP addresses (victim or victims) at layer three and avoid wasting resources on their processing.
I have just totally ripped off this iptables rules from here, so credit goes to RawShark:
iptables mitigation of Quake 3 DDoS amplification attack
12345678910111213141516171819202122232425262728
# create chainiptables -N quake3_ddos
# accept real client/player trafficiptables -A quake3_ddos -m u32 ! --u32 "0x1c=0xffffffff" -j ACCEPT
# match "getstatus" queries and remember their addressiptables -A quake3_ddos -m u32 --u32 "0x20=0x67657473&&0x24=0x74617475&&0x25&0xff=0x73" -m recent --name getstatus --set
# drop packet if "hits" per "seconds" is reached## NOTE: if you run multiple servers on a single host, you will need to higher these limits# as otherwise you will block regular server queries, like Spider or QConnect# e.g. they will query all of your servers within a second to update the listiptables -A quake3_ddos -m recent --update --name getstatus --hitcount 5 --seconds 2 -j DROP
# accept otherwiseiptables -A quake3_ddos -j ACCEPT
### finally insert the chain as the top most input filter# single server# iptables -I INPUT 1 -p udp --dport 27960 -j quake3_ddos# multiple serversiptables -I INPUT 1 -p udp --dports 27960,27961,27962 -j quake3_ddos
Only lef to say we only filtered “getstatus” command with those iptables rules, remember the others commands as well.
Hunting it down across the network
Once we know the ins and outs of this type of DDoS attack and analyzed generate network traffic, as well as readed tool code, we are closer of being able to spot this way of flood and trying to mitigate it. We need to have in mind the fact that, lower TCP/IP layer used to detect anomalous traffic patterns, lower use of resources; it will be much easier to stop a datagram at network layer - maybe based in IP addresses of known Quake 3 servers ;) - than going up to application layer trying to stop a datagram based on its payload and, when dealing with attacks of dozens or hundred of Gbs, the difference will be crucial.
Using tshark for network analysis
tshark is a terminal based version of Wireshark for doing powerful and quick network packet capturing/analysis and is really useful when doing network forensics because we can use Wireshark’s DisplayFilters including a lot of supported protocols.
Also, if you are interested in tshark/network analysis, I highly recommend this ebook called “Instant Traffic Analysis with Tshark How-to” and written by Borja Merino, it offers a quick and really useful set of recipes for analyzing traffic with tshark, totally worths it.
For example, let’s specify tshark to show Quake 3 datagrams (using quake3 dissector) with a UDP length of 22 bytes (we could set more specific options):
By default tshark will print info with this format “frame number; relative time; source IP; destination IP; dissected protocol; frame size (bytes); protocol dissected info” as shown above but it isn’t well formatted for an easy processing, so let’s say tshark to show output as formatted CSV:
Now we could make a script to consume tshark output and deploy firewall rules in almost real-time or, maybe, make some pretty statistics for the unavoidable report once the attack has finished / been mitigated.
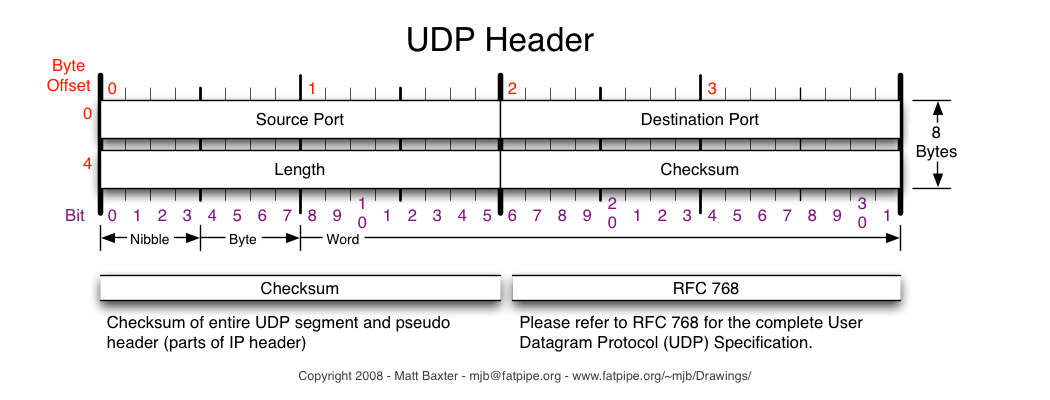
Probably you are asking yourself the reason I specified an UDP length of 22 bytes, so take a look to the structure of an UDP datagram:
As we saw when analyzing udp.c code and his mistakes, an UDP header size is 8 bytes plus any payload, because in this case we have a payload of 14 (“….disconnect”) bytes it does a total sum of 22 bytes for a triggered response of “disconnect” (response provoked by bad seted UDP length in original udp.c code) so it would be useful against this specific bad coded version of attackers’ tool, despite of it should be improved and/or adapted for others versions of scripts or for a well carried spoofed attack in which Quake 3 servers will answer with server info and no with a “disconnect” command.
At last but not least, tshark also allow to use Wireshark’s ”contains” and “match” filters to show only those packets with a specific pattern:
thsark filtering UDP datagrams with “….disconnect” text
When comparing these results against the previous ones we can observe more amplifiers servers because we are not relying on UDP source port but in UDP payload content to detect them.
Using ngrep to build iptables rules
ngrep is a network troubleshooting tool that allow us to analyze previously captured traffic in a pcap file or a life sniffing session to debug traffic in a similar way like “grep” Unix tool, his primary goal is to parse and display plaintext protocols like HTTP or SMTP.
In this case we are going to “grep” for a “….disconnect” string specifying to don’t print hash marks (-q) :
network forensic with ngrep
123456789101112131415161718192021
$ ngrep -q -I udp_quake3.pcap.cloaked '\xFF\xFF\xFF\xFFdisconnect'U 128.66.238.228:27961 -> 128.66.7.9:26457
....disconnect....
U 128.66.0.103:27960 -> 128.66.7.9:65247
....disconnect....
U 128.66.217.157:27960 -> 128.66.7.9:48320
....disconnect....
U 128.66.238.48:27960 -> 128.66.7.9:32267
....disconnect....
U 128.66.132.204:27960 -> 128.66.7.9:58316
....disconnect....
U 128.66.168.194:27993 -> 128.66.7.9:12525
....disconnect....
U 128.66.168.248:27961 -> 128.66.7.9:8946
....disconnect....
While this format is easy to read by a human we would need to parse it prior to doing any kind of filtering. For example, we could parse this output to just show Quake 3 amplifiers servers being used in the attack to generate some type of firewall rule:
parsing ngrep output to get just amplifiers IP addresses
We could go a step ahead and create a set of DROP rules for a Linux router with iptables beyond parsing ngrep output:
generating iptables rules based on ngrep output
1234567
$ for ip in `ngrep -q -I udp_quake3.pcap.cloaked '\xFF\xFF\xFF\xFFdisconnect' | awk '/U [0-9]+\.[0-9]+\.[0-9]+\.[0-9]+:[0-9]+/{print $2}' | cut -d ':' -f 1 | sort -u`; do echo"iptables -A FORWARD -s $ip -j DROP" >> quake3_ddos.iptables; done$ head -n 5 quake3_ddos.iptables
iptables -A FORWARD -s 128.66.0.103 -j DROP
iptables -A FORWARD -s 128.66.0.18 -j DROP
iptables -A FORWARD -s 128.66.0.181 -j DROP
iptables -A FORWARD -s 128.66.0.246 -j DROP
iptables -A FORWARD -s 128.66.0.27 -j DROP
Parsing attack with scapy and automatic deployment of a Cisco IOS access-list
Ok, analyzing network traffic and spotting attack patterns is fun, but analyzing traffic looking for previously spotted pattern and automatically blocking attacking IP addresses at perimetral routers is far better, so I’m going to explain how to make such easy but powerful script in a few lines with python.
We are going to need scapy again as well as exscript module to interact with Cisco routers. Then we just need to analyze UDP datagrams and look for “….disconnect” or “….statusResponse” in payload content to list Quake 3 servers being used as amplifiers, once done only remains to create access-list entries for those IP address.
#!/usr/bin/env python#coding:utf-8# Author: Alejandro Nolla - z0mbiehunt3r# Purpose: Example for identifying Quake 3 amplifiers and block them with Cisco access-list # Created: 21/06/13importsystry:fromExscript.util.interactimportread_loginfromExscript.protocolsimportSSH2exceptImportError:print'You need exscript (https://github.com/knipknap/exscript)'sys.exit(-1)importlogginglogging.getLogger("scapy.runtime").setLevel(logging.ERROR)# supress everything below errortry:fromscapy.allimportrdpcapexceptImportError:print'You need scapy (http://www.secdev.org/projects/scapy/)'sys.exit(-1)#----------------------------------------------------------------------defextract_quake3_amplifiers(pcap_file_path):""" It will classify an IP address as an amplifier if UDP payload consists of "....disconnect" or "....statusResponse" command @param pcap_file_path: Path to pcap file to parse @type pcap_file_path: str @return: Set with amplifiers servers @rtype: set """amplifiers_servers=set()''' rdpcap will read all packets at once, if you need to read it sequentially take a look to PcapReader http://www.sourcecodebrowser.com/scapy/1.0.2/classscapy_1_1_pcap_reader.html '''packets=rdpcap(pcap_file_path,count=1000)forpacketinpackets:ifnotpacket.haslayer('UDP'):continueifpacket.haslayer('Raw'):raw_udp_payload=packet.getlayer('Raw')ip_layer=packet.getlayer('IP')ifraw_udp_payload.load=='\xff\xff\xff\xffdisconnect'or\
raw_udp_payload.load[0:18]=='\xff\xff\xff\xffstatusResponse':amplifiers_servers.add(ip_layer.src)returnamplifiers_serversif__name__=='__main__':PCAP_FILE='./udp_quake3.pcap.cloaked'print'''Example of Quake 3 DDoS amplification attack parser to automatically deploy Cisco IOS access-list - by Alejandro Nolla (z0mbiehunt3r)'''print'[*] Parsing %s'%PCAP_FILEamplifiers_servers=extract_quake3_amplifiers(PCAP_FILE)print'[+] Got %i amplifiers servers being used in the attack...'%len(amplifiers_servers)account=read_login()# read login from promptconn=SSH2()conn.connect('192.168.1.245')conn.login(account)printconn.responseconn.execute('config t')printconn.response# create access-listprint'[!] Deploying access-list, take a coffee...'conn.execute('ip access-list extended quake3_ddos')forserverinamplifiers_servers:''' here we directly block IP protocol but we could block UDP for Quake 3 responses and ICMP protocol for traffic potentially being generated for hosts/ports unreachable and so on typical in DDoS attacks (backscatter effect) Also, we could block only ports being used in the attack (game ones, finite) '''conn.execute('deny ip host %s any'%server)# add one rule per amplifier# caution with implicit deny (legitimate users' traffic, routing protocols, etc)conn.execute('permit ip any any')# apply access-list to interfaceconn.execute('interface fastEthernet 1/1')conn.execute('ip access-group quake3_ddos in')# quick'n dirty way for copy running-config startup-configconn.execute('do wr')printconn.responseconn.send('exit\r')conn.close()print'[-] SLD-26 shield deployed'
Time to execute it and await, it’s going to take his time when processing a real DDoS capture (millions of packets), so it’s highly recommended to make a prior filter with tshark and adapt this script to use multiple CPUs (or programming it in C):
parsing and generating access-list
123456789101112131415161718
$ python quake3_ddos_parser.py
Example of Quake 3 DDoS amplification attack parser to automatically deploy Cisco IOS access-list
- by Alejandro Nolla (z0mbiehunt3r)[*] Parsing ./udp_quake3.pcap.cloaked
[+] Got 455 amplifiers servers being used in the attack...
Please enter your user name [z0mbiehunt3r]: cisco
Please enter your password:
Endor#
config t
Enter configuration commands, one per line. End with CNTL/Z.
Endor(config)#[!] Deploying access-list, take a coffee...
do wr
Building configuration...
[OK]Endor(config-ext-nacl)#[-] SLD-26 shield deployed
Now connect to our router and check if everything went ok:
checking access-list for quake 3 amplifiers
123456789
Endor> enable
Endor# show ip access-lists quake3_ddos
Extended IP access list quake3_ddos
10deny ip host 192.0.2.239 any
20deny ip host 128.66.194.14 any
30deny ip host 128.66.233.82 any
40deny ip host 128.66.186.59 any
50deny ip host 128.66.150.252 any
[...]
Well, so it seems access-list was created ok, attack traffic should begin to be dropped (at filtering router) in seconds, time to figure out next attack vector that will try being exploited, attackers will move to another technique for sure.
Creating a snort rule
If we have a snort sensor or IPS system we could create specific rules based on detected attack pattern to protect us against analyzed DDoS technique. Anyway, going up to application layer is highly discouraged to mitigate a real DDoS attack because it will require more CPU and RAM to process each packet not only because of unwrapping more layers but because specific “simple” filtering actions like filtering on IP addresses and/or ports are performed through packet forwarding hardware (ASIC) and will be far better than a CPU filtering approach done in most majority of appliances.
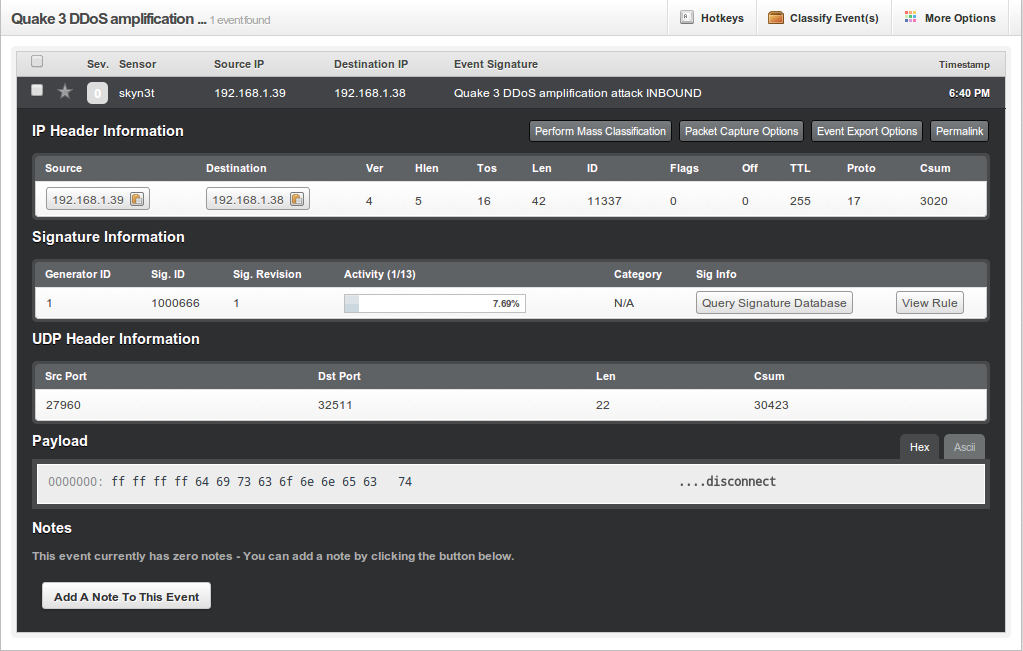
For testing purposes I have used a security onion virtual machine with snort and snorby running for capturing and visualizing alerts respectively. To create a snort rule to detect inbound DDoS amplification attack using Quake 3 servers we are going to look for “…disconnect” (again it works only for analyzed script and should be extended to the others already analyzed caseloads) in UDP payload, now it’s time to read “Writing Snort Rules”:
detecting attack with snort
123
# vim /etc/nsm/rules/local.rulesalert udp any any -> any any (msg:"Quake 3 DDoS amplification attack INBOUND"; content:"|ff ff ff ff 64 69 73 63 6f 6e 6e 65 63 74|"; nocase; offset:0; depth:14; sid:1000666; rev:1;)# rule-update
alert udp any any -> any any: analyze any source:port to any destination:port if UDP
content: tell snort hex string to search
nocase: in a no case sensitive way
offset: start analyzing in offset 0 for payload
depth: and only up to next 14 bytes (for speed optimization, size of content searched)
If we create this rule and use scapy as shown before to send a UDP datagram with this pattern an alert will be triggered and a new event will be shown in our snorby interface:
If we analyze with attention the previous image we are can see IP ToS, TTL, UDP length and payload as previously analyzed, so it seems our patterns works fine (despited of it should be improved).
Conclusions
After spending some weeks researching about this kind of attack vector -using several games servers as amplifiers- I’m sure it’s an attack that can be really powerful to launch storms of spoofed UDP datagrams with almost no cost or effort at all, it’s really easy to get an almost real time updated list of online servers without having to make any kind of port scanning but just parsing online gaming directories and, to make matters worse, amplification factors can be up to several dozens original throughput and, because this kind of attack is less known, IT people will be less aware and ready to face off such techniques.
The fact that this kind of attack is being actively used in DDoS as a service platforms to launch attacks from several web booters makes important to know this attack, how to detect it and how to try to defend against him, so stay alert and see you at next post!